
Browned butter takes a simple apple and walnut cake from nice to gotta-have-another-slice.
Beurre noisette — browned butter — is having a big moment. I’m here for it as long as the trend lasts, and I’ll stick with it long after it fads.
Browning butter is a classic technique that simply involves cooking butter over gentle heat until it turns light brown with a nutty fragrance. The result is an intense, complex flavor that lends heft to all manner of dishes, from pasta to cookies.
Browned butter also boosts the flavor of this Chocolate-Marbled Banana Bread >>
In this case, I was revisiting an old recipe to use apples left over from a photo shoot. The original apple cake, based on a Shaker recipe, was fine. But I craved something more. Browning the butter is a small step that pays big dividends.
How to make ghee (Indian-style clarified butter)>>
Apple Cake Recipe Notes
- I’m leading here with weights for ingredients because, as I note in this post, it’s both easier and offers more consistent results. Why you need more than one thermometer and a kitchen scale>>
- Use a stainless-steel pan or pot to brown the butter. The pan’s light color makes it easy to monitor the butter’s color as it progresses from yellow to nutty brown. (I tend to let my beurre noisette go pretty far – more like a dark brown roux, just this side of burned. If you’re new to browning butter, err on the side of lighter.)
- Allow the butter to cool before combining it with the egg, sugar and vanilla. Too-hot butter will cause the egg to curdle.
- Using a room-temperature egg and milk helps them combine more easily with the other ingredients.
- Traditionally, this kind of cake is spiced with ground cinnamon. I find using kafe hawaij, a Middle Eastern blend of cardamom, cinnamon, ginger and clove, adds more complexity.
- I like the richness of whole milk in this recipe, but it also works with reduced-fat milk.
Keeping it simple runs in the family. Check out my mom’s Sour Cream Coffee Cake recipe>>
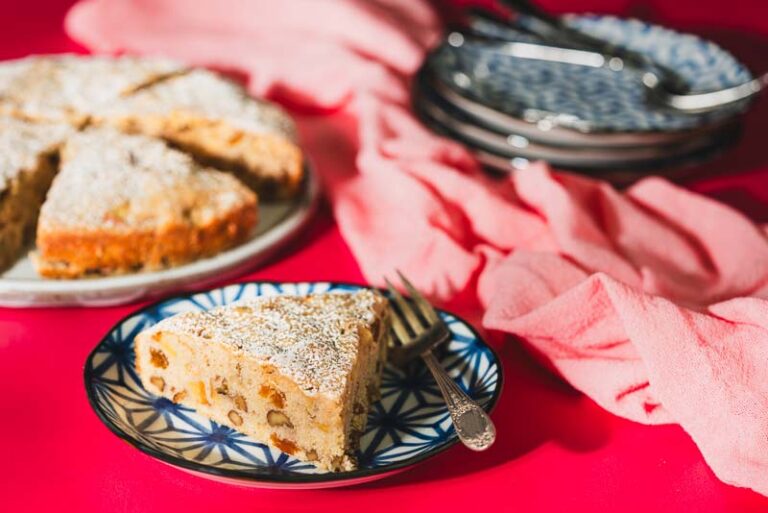
Browned Butter Apple & Walnut Cake with Golden Raisins
Equipment
- 1 kitchen scale
- 1 small saucepan
- 1 (9-inch) cake pan
- 1 whisk
- 1 spatula
Ingredients
- 71 grams butter (2½ ounces/5 tablespoons)
- cooking spray
- 191 grams all-purpose flour (6¾ ounces/1½ cups, plus more for dusting)
- 2 teaspoons baking powder
- ½ teaspoon kafe hawaij (or ground cinnamon
- ¼ teaspoon salt
- 172 grams granulated sugar (6 ounces/¾ cup)
- 1 teaspoon vanilla extract
- 1 large egg, at room temperature
- ½ cup milk
- 1 medium apple, finely chopped (such as Pink Lady or Braeburn)
- 72 grams golden raisins (2½ ounces/½ cup)
- 60 grams walnuts (2 ounces/½ cup, finely chopped)
- 1 teaspoon powdered sugar
Instructions
- Preheat oven to 350°F.
- Melt the butter in a small saucepan or skillet over medium heat. Cook 2-3 minutes or until browned. Butter goes from deliciously nutty and browned to burned in seconds, so keep a close eye on it as it cooks. Remove from heat and let cool.
- Coat a 9-inch round cake pan with cooking spray, and dust with flour.
- In a medium bowl, combine flour, baking powder, kafe hawaij and salt, stirring with a whisk.
- In large bowl, whisk the granulated sugar, cooled browned butter, vanilla and egg until well combined. Alternate whisking in the milk and flour mixture, beginning and ending with the milk. Fold in the apple, raisins and walnuts.
- Scrape the batter into the prepared pan, spreading evenly. Bake 25-30 minutes or until a wooden pick inserted in the center comes out clean. Cool 10 minutes in the pan on a wire rack. Remove from pan and cool completely on the rack. Transfer the cake to a plate, and sift the powdered sugar over the top.